Raspberry Pi Stratum 1 NTP Server Build - Part 1
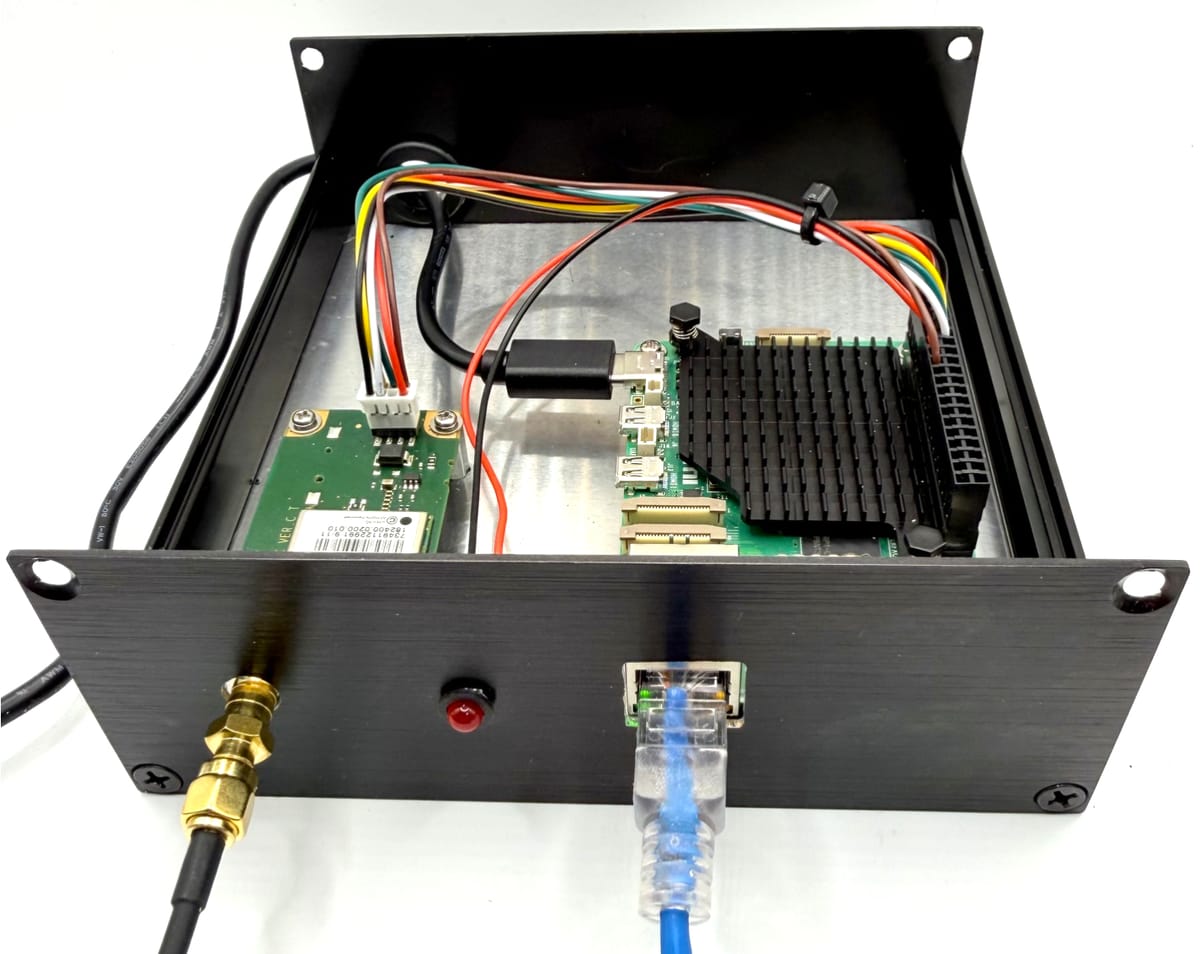
Recently I decided to build a new GNSS/GPS based NTP server using a Raspberry Pi 5. I had previously done this on a Raspberry Pi 3 however this hadn't been working for a while so rather than just re-building that I thought I would improve on that build. Much of this build was initially based on this excellent guide by Austin's Nerdy Things: https://austinsnerdythings.com/2025/02/14/revisiting-microsecond-accurate-ntp-for-raspberry-pi-with-gps-pps-in-2025. This recent article by Jeff Geerling was a useful reference too: https://www.jeffgeerling.com/blog/2026/truetime-xl-gps-time-server-restomod.
When I started writing this article, I realised it was going to be quite long so I will split it into two parts. Part 1 will cover the initial build and basic configuration. Part 2 will cover some enhancements I made to improve the stability, and the set up of Telegraf for monitoring.
Hardware
Hardware Requirements
- Raspberry Pi. I used a Raspberry Pi 5 with 8GB RAM but much the same configuration can be used with other models.
- GNSS/GPS Module. I selected the U-blox LEA-M8T for this. This is a timing specific GNSS module that is available for a reasonable price. These modules are available on Aliexpress: https://www.aliexpress.com/item/1005006846801239.html. Note that this particular module has an SMB male connector so requires an SMB female to SMA female adapter to be able to use it with most GNSS antennas.
- GNSS/GPS Antenna. I wanted an outdoor antenna to ensure a good signal so ordered this module from Aliexpress: https://www.aliexpress.com/item/1005012251753179.html.
- Enclosure. I ordered a cheap aluminium box from Amazon.
- Miscellaneous screws, mounting hardware, wire etc. Note that the pins for the connector on the above GNSS module are 2.0mm pitch rather than the 2.54mm pitch of the Raspberry Pi Dupont header. This meant that I could not use readily available Dupont cables to make the connections to the module. I ended up purchasing these PHD 2.0mm connectors for the GNSS module end and terminating on a Dupont connector for the Raspberry Pi side: https://www.aliexpress.com/item/1005005940137789.html.
Wiring the GNSS Module to the Raspberry Pi
The pinout for the connector on the U-blox LEA-M8T module is:
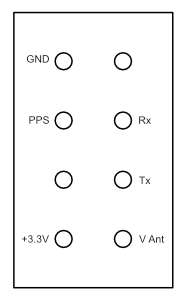
The connections required to the Raspberry Pi are:
- GNSS +3.3V to Raspberry Pi Pin 1
- GNSS GND to Raspberry Pi Pin 6
- GNSS Rx to Raspberry Pi Pin 8
- GNSS Tx to Raspberry Pi Pin 10
- GNSS PPS to Raspberry Pi Pin 12 (GPIO 18)
- GNSS V Ant to Raspberry Pi Pin 17 (3.3V)
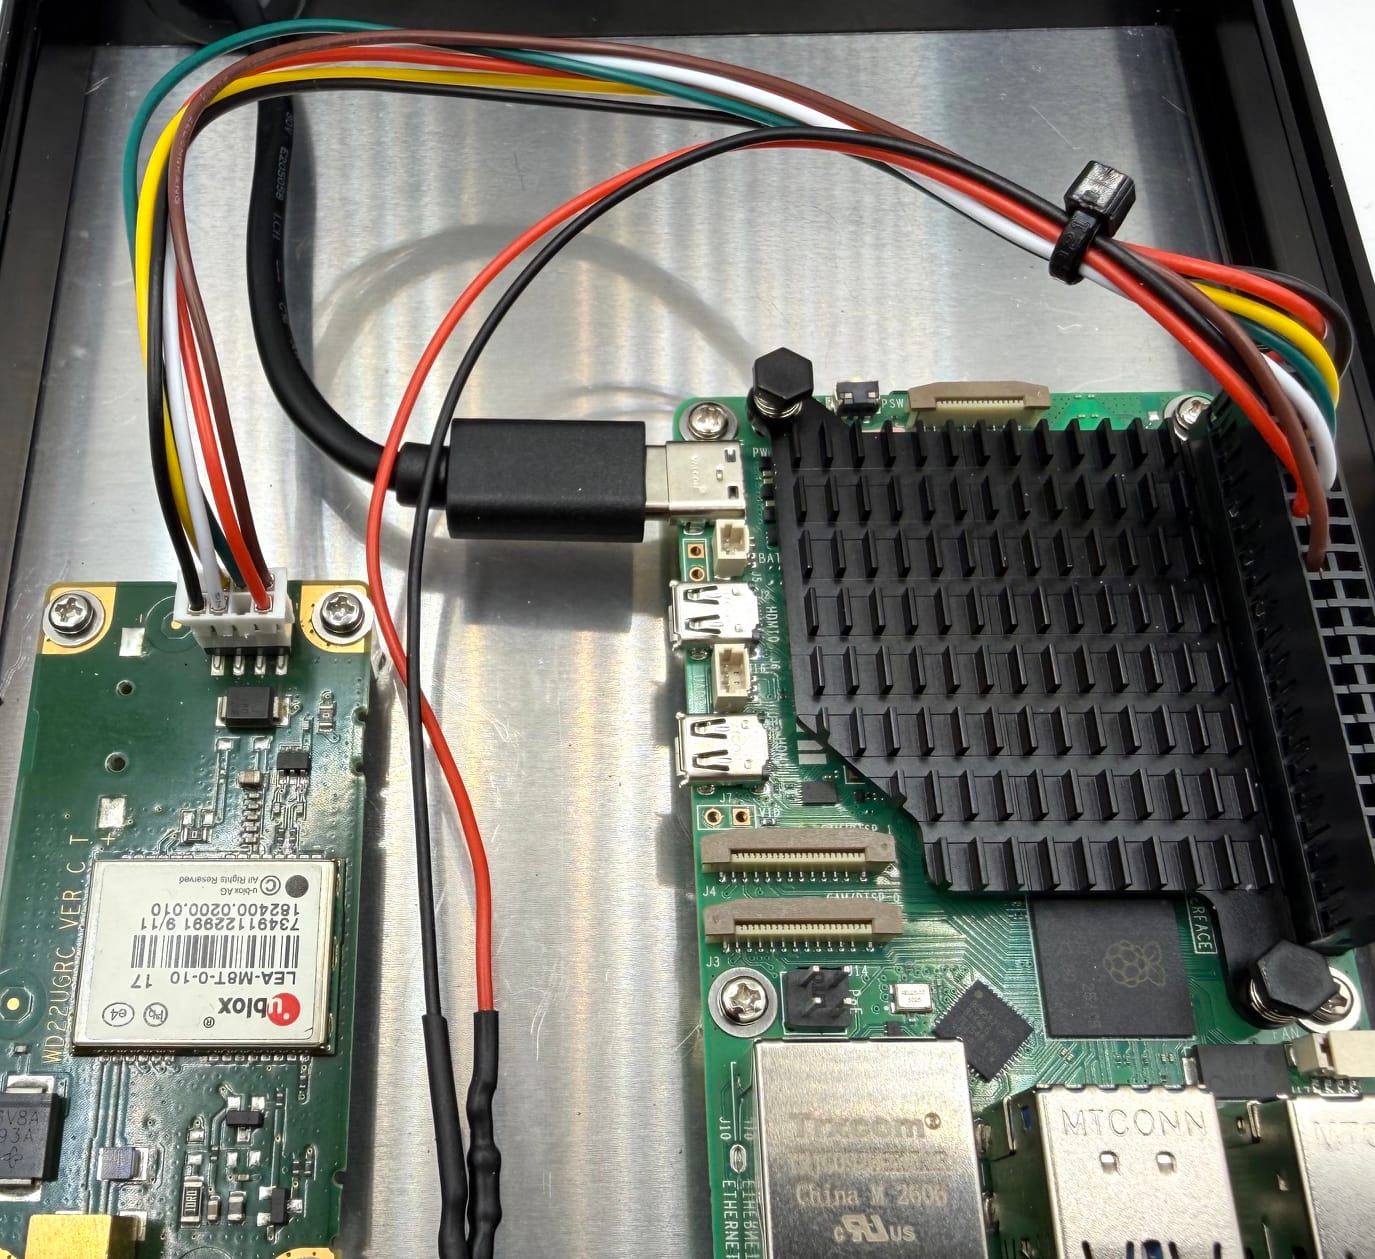
Here is a close up of the wiring:
Software
Install the Raspberry Pi OS
The first step is to flash the Raspberry Pi OS to a microSD card with the Raspberry Pi Imager tool. The tool and the documentation are available on the official Raspberry Pi site: https://www.raspberrypi.com/software/. I used the "Raspberry Pi OS Lite (64-bit)" image as there is no need for a desktop environment when building a NTP server.
Once the Raspberry Pi OS has been installed and is running, install any updates:
sudo apt update
sudo apt upgrade
Set a static IP address on the server. The network configuration on the Raspberry Pi OS can be changed with the "nmtui" tool.
Install GPSD and Chrony
Install the following packages for GPSD and Chrony. The pps-tools package is also installed to confirm that PPS is functioning correctly.
sudo apt install pps-tools gpsd gpsd-clients chronyEnable the Serial Port
This is done through the "raspi-config" tool.
"Interface Options" -> "Serial Port" -> "Would you like a login shell to be accessible over serial" -> Select "No" -> "Would you like the serial port hardware to be enabled?" -> Select "Yes"
Raspberry Pi Configuration
Add the 'pps-gpio' module:
sudo bash -c "echo 'pps-gpio' >> /etc/modules"Edit "/boot/firmware/config.txt" to configure PPS (Pulse Per Second) on GPIO PIN 18, set the serial baud rate and I also disabled WiFi and Bluetooth since these won't be needed. The following can be added under the [all] section in the file:
dtoverlay=pps-gpio,gpiopin=18
dtoverlay=disable-wifi-pi5
dtoverlay=disable-bt-pi5
dtparam=eee=off
enable_uart=1
init_uart_baud=57600
At this point, reboot the Raspberry Pi for these settings to take effect.
Once the device has rebooted, check that PPS is functioning correctly with the "ppstest" tool":
sudo ppstest /dev/pps0The output should look like the following with one line printed every second:
trying PPS source "/dev/pps0"
found PPS source "/dev/pps0"
ok, found 1 source(s), now start fetching data...
source 0 - assert 1791630656.999999560, sequence: 950018 - clear  0.000000000, sequence: 0
source 0 - assert 1791630658.000000067, sequence: 950019 - clear  0.000000000, sequence: 0
source 0 - assert 1791630658.999999908, sequence: 950020 - clear  0.000000000, sequence: 0
source 0 - assert 1791630659.999999376, sequence: 950021 - clear  0.000000000, sequence: 0
Increase the Baud Rate of the GNSS Module
As mentioned in the Austin's Nerdy Things guide, the default 9600 baud rate on some GPS/GNSS modules can be problematic due to the time it takes for the transmission of the NMEA sentences over the slow serial connection. The baud rate for the U-blox LEA-M8T module can be changed using "ubxtool".
Firstly ensure that gpsd is stopped, then connect and 9600 to set the baud rate to 57600, then connect at 57600 and save the configuration.
systemctl stop gpsd

ubxtool -s 9600 -S 57600 -f /dev/ttyAMA0 -P 22.00
ubxtool -s 57600 -p SAVE -f /dev/ttyAMA0 -P 22.00
Configure GPSD
Edit "/etc/default/gpsd" and ensure the following are set:
DEVICES="/dev/ttyAMA0 /dev/pps0"

GPSD_OPTIONS="-n -s 57600"

START_DAEMON="true"
Start GPSD:
systemctl start gpsd
The "cgps" tool to check that satellites are being seen and that the NMEA sentences are coming through.
Configure Chrony
Once it has been confirmed that "ppstest" is showing the PPS signals and cgps shows a fix and NMEA sentences coming through then it is time to configure Chrony.
Edit the "/etc/chrony/chrony.conf" configuration file, first disable the pool servers and the sources from DHCP:
# Use Debian vendor zone.
# pool 2.debian.pool.ntp.org iburst

# Use time sources from DHCP.
# sourcedir /run/chrony-dhcp
Then add the GPSD and PPS sources:
refclock SOCK /run/chrony.ttyAMA0.sock refid NMEA offset 0.0 delay 0.05 noselect
refclock PPS /dev/pps0 refid PPS lock NMEA offset 0.0 poll 3 trust prefer
The PPS refclock provides the sub-second precise timing on the second boundary, but does not provide the actual time/date itself. The "lock NMEA" means that it will get the time/date from the NMEA messages. In this configuration, "trust" means that we will always accept PPS as being "correct" if it is available, overriding the falseticker detection mechanisms (unless there are other sources also configured with "trust"). The "prefer" option means that we will prefer this source over other sources that don't have "prefer" specified. The "noselect" option is added to the NMEA refid so that this source will never be selected. The only way this source is used is via the lock mechanism for the PPS refclock.
I also chose some Stratum 1 servers that appeared close by and added them as a backup:
server <ntp server> iburstConfigure hosts/networks allowed to access the server. This can either allow everything or can be restricted to specific networks or hosts (it is recommended to restrict to specific networks unless running a public NTP server):
# Allow from anywhere
allow all

# Restrict to specific networks
allow <ipv4 network>
allow <ipv6 network>
Save the configuration file and restart Chrony:
systemctl restart chronyThe "chronyc" command is used for monitoring the status of Chrony. The "chronyc sources" command shows the status of the sources that Chrony is using. Once Chrony is successfully getting time from the GNSS module, and using PPS, the PPS source should be selected as the best source:
# chronyc sources -v

  .-- Source mode  '^' = server, '=' = peer, '#' = local clock.
 / .- Source state '*' = current best, '+' = combined, '-' = not combined,
| /             'x' = may be in error, '~' = too variable, '?' = unusable.
||                                                 .- xxxx [ yyyy ] +/- zzzz
||      Reachability register (octal) -.           |  xxxx = adjusted offset,
||      Log2(Polling interval) --.      |          |  yyyy = measured offset,
||                                \     |          |  zzzz = estimated error.
||                                 |    |           \
MS Name/IP address         Stratum Poll Reach LastRx Last sample
===============================================================================
#? NMEA                          0   4   377    19    +33ns[  -42ns] +/-   25ms
#* PPS                           0   3   377     3    -53ns[  -95ns] +/-  126ns
The "chronyc tracking" command shows the status of the system clock:
# chronyc tracking
Reference ID    : 50505300 (PPS)
Stratum         : 1
Ref time (UTC)  : Mon Oct 12 02:40:50 2026
System time     : 0.000000000 seconds fast of NTP time
Last offset     : -0.000000069 seconds
RMS offset      : 0.000000083 seconds
Frequency       : 9.772 ppm fast
Residual freq   : -0.000 ppm
Skew            : 0.006 ppm
Root delay      : 0.000000001 seconds
Root dispersion : 0.000004478 seconds
Update interval : 8.0 seconds
Leap status     : Normal
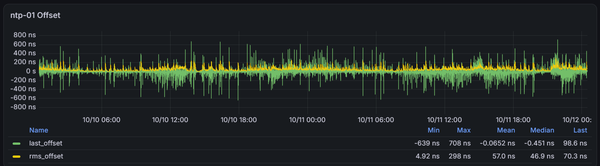
The "Last offset" field is the estimated error on the last clock update and the "RMS offset" is the long term average of the offset value which represents the magnitude of the offset over time rather than just the last sample. These metrics are useful for tracking the accuracy of the NTP server over time. These vary at times however I'm generally happy to see the RMS offset below 100ns. The Frequency field shows the drift of the oscillator without correction, and the Skew field is Chrony's estimated error of the frequency. These are also useful metrics to track when determining the stability of the NTP server. Part 2 of this article will cover some further changes I made to improve the stability of these values.
The chronyc documentation gives a full description of these fields: https://chrony-project.org/doc/3.4/chronyc.html
Once clients start connecting to the server, the client connections can be monitored with the "chronyc clients" command.