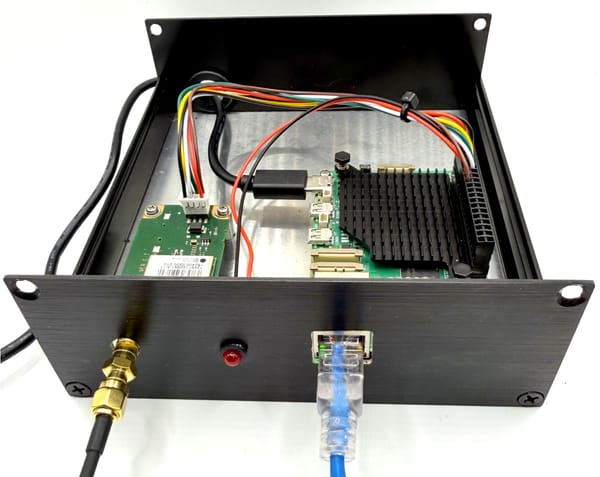
Raspberry Pi Stratum 1 NTP Server Build - Part 2
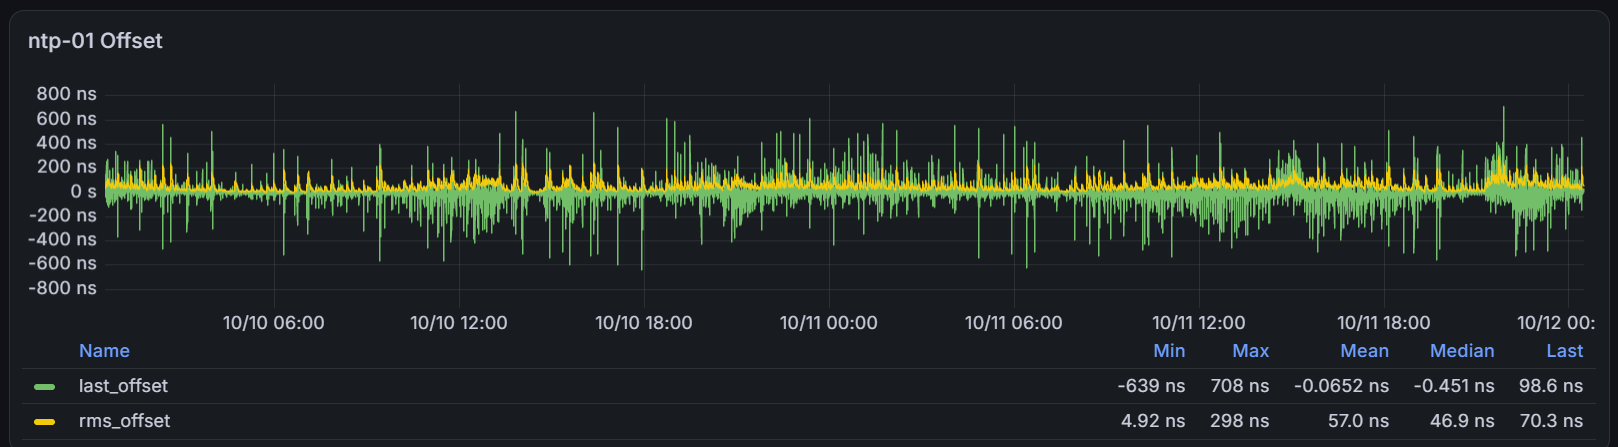
This post is a follow on to the previous post Raspberry Pi Stratum 1 NTP Server Build - Part 1. This part covers the basics of setting up Telegraf to collect metrics from Chrony, some attempts to improve the stability of Chrony's time offsets, and finally adding a PPS LED to provide a visual indication of the PPS signal.
Monitoring Chrony with Telegraf
The first step to being able to track how well the NTP server is working is to set up monitoring to track statistics from Chrony such as the Offsets, Frequency and Skew. Telegraf has a Chrony input plugin which can be used to collect these statistics and send them to InfluxDB so that the statistics can be graphed with Grafana. There are many tutorials for setting up InfluxDB and Grafana so I will stick to just the specific Telegraf configuration to get Chrony stats in to InfluxDB.
The first step is to install Telegraf. The procedure is based on the official documentation: https://docs.influxdata.com/telegraf/v1/install/#install-from-the-influxdata-repository
curl --silent --location -O https://repos.influxdata.com/influxdata-archive.key
gpg --show-keys --with-fingerprint --with-colons ./influxdata-archive.key 2>&1 | grep -q '^fpr:\+24C975CBA61A024EE1B631787C3D57159FC2F927:$' && cat influxdata-archive.key | gpg --dearmor | sudo tee /etc/apt/keyrings/influxdata-archive.gpg > /dev/null && echo 'deb [signed-by=/etc/apt/keyrings/influxdata-archive.gpg] https://repos.influxdata.com/debian stable main' | sudo tee /etc/apt/sources.list.d/influxdata.list
sudo apt update
sudo apt install telegraf
Edit the Telegraf configuration file. Firstly, edit the configuration to send metrics to InfluxDB. The exact values here will depend on your InfluxDB configuration:
[[outputs.influxdb_v3]]
  urls = ["<InfluxDB URL>"]

  token = "<InfluxDB Authentication Token>"

  database = "<Database>"
Then configure the Chrony input plugin configuration. This is the configuration I am currently using:
# Get standard chrony metrics.
[[inputs.chrony]]
  ## Server address of chronyd with address scheme
  ## If empty or not set, the plugin will mimic the behavior of chronyc and
  ## check "unixgram:///run/chrony/chronyd.sock", "udp://127.0.0.1:323"
  ## and "udp://[::1]:323".
  # server = ""

  ## Timeout for establishing the connection and for each request/response
  # timeout = "3s"

  ## Try to resolve received addresses to host-names via DNS lookups
  ## Disabled by default to avoid DNS queries especially for slow DNS servers.
  # dns_lookup = false

  ## Metrics to query named according to chronyc commands
  ## Available settings are:
  ##   activity    -- number of peers online or offline
  ##   tracking    -- information about system's clock performance
  ##   serverstats -- chronyd server statistics
  ##   sources     -- extended information about peers
  ##   sourcestats -- statistics on peers
  metrics = ["tracking", "sources", "sourcestats"]

  ## Socket group & permissions
  ## If the user requests collecting metrics via unix socket, then it is created
  ## with the following group and permissions.
  # socket_group = "chrony"
  # socket_perms = "0660"
The header image from this article shows an example of a Grafana panel generated from this data.
Tuning the Raspberry Pi to Improve Time Stability
The initial build provided accurate time which is perfectly fine for most applications however I was interested to see if I could further improve on the offset metrics. I once again used some ideas from a great Austin's Nerdy Things guide: https://austinsnerdythings.com/2025/11/24/worlds-most-stable-raspberry-pi-81-better-ntp-with-thermal-management/. I have not tried the thermal stabilization script mentioned in that guide however I found that some other suggestions such as the CPU core pinning were helpful. I took a slightly different approach for configuring this though.
Setting a Fixed CPU Speed
The Austin's Nerdy Things guide sets the CPU governor to "performance" which statically sets the clock to use the highest possible frequency. I was concerned about overheating the CPU given that I only have a passive heatsink and no active cooling, so instead I have used the "userspace" governor with a static frequency set lower than the maximum which can be configured using the "cpupower" tool.
First, install the package:
sudo apt-get install linux-cpupowerThe current configuration can be checked with the "cpupower frequency-info" command. This shows which governor is currently configured along with the available frequency options (note that this output is after having already configured the "userspace" governor):
# cpupower -c 0-3 frequency-info
analyzing CPU 0:
  driver: cpufreq-dt
  CPUs which run at the same hardware frequency: 0 1 2 3
  CPUs which need to have their frequency coordinated by software: 0 1 2 3
  maximum transition latency: 1000 us
  hardware limits: 600 MHz - 1.50 GHz
  available frequency steps:  600 MHz, 700 MHz, 800 MHz, 900 MHz, 1000 MHz, 1.10 GHz, 1.20 GHz, 1.30 GHz, 1.40 GHz, 1.50 GHz
  available cpufreq governors: conservative ondemand userspace powersave performance schedutil
  current policy: frequency should be within 800 MHz and 800 MHz.
                  The governor "userspace" may decide which speed to use
                  within this range.
  current CPU frequency: 800 MHz (asserted by call to kernel)
  boost state support:
    Active: no
analyzing CPU 1:
  driver: cpufreq-dt
  CPUs which run at the same hardware frequency: 0 1 2 3
  CPUs which need to have their frequency coordinated by software: 0 1 2 3
  maximum transition latency: 1000 us
  hardware limits: 600 MHz - 1.50 GHz
  available frequency steps:  600 MHz, 700 MHz, 800 MHz, 900 MHz, 1000 MHz, 1.10 GHz, 1.20 GHz, 1.30 GHz, 1.40 GHz, 1.50 GHz
  available cpufreq governors: conservative ondemand userspace powersave performance schedutil
  current policy: frequency should be within 800 MHz and 800 MHz.
                  The governor "userspace" may decide which speed to use
                  within this range.
  current CPU frequency: 800 MHz (asserted by call to kernel)
  boost state support:
    Active: no
analyzing CPU 2:
  driver: cpufreq-dt
  CPUs which run at the same hardware frequency: 0 1 2 3
  CPUs which need to have their frequency coordinated by software: 0 1 2 3
  maximum transition latency: 1000 us
  hardware limits: 600 MHz - 1.50 GHz
  available frequency steps:  600 MHz, 700 MHz, 800 MHz, 900 MHz, 1000 MHz, 1.10 GHz, 1.20 GHz, 1.30 GHz, 1.40 GHz, 1.50 GHz
  available cpufreq governors: conservative ondemand userspace powersave performance schedutil
  current policy: frequency should be within 800 MHz and 800 MHz.
                  The governor "userspace" may decide which speed to use
                  within this range.
  current CPU frequency: 800 MHz (asserted by call to kernel)
  boost state support:
    Active: no
analyzing CPU 3:
  driver: cpufreq-dt
  CPUs which run at the same hardware frequency: 0 1 2 3
  CPUs which need to have their frequency coordinated by software: 0 1 2 3
  maximum transition latency: 1000 us
  hardware limits: 600 MHz - 1.50 GHz
  available frequency steps:  600 MHz, 700 MHz, 800 MHz, 900 MHz, 1000 MHz, 1.10 GHz, 1.20 GHz, 1.30 GHz, 1.40 GHz, 1.50 GHz
  available cpufreq governors: conservative ondemand userspace powersave performance schedutil
  current policy: frequency should be within 800 MHz and 800 MHz.
                  The governor "userspace" may decide which speed to use
                  within this range.
  current CPU frequency: 800 MHz (asserted by call to kernel)
  boost state support:
    Active: no
In order to configure the cpupower service so that the governor and frequency are set at boot, edit the "/etc/cpupower-service.conf" configuration file. Set the GOVERNOR to "userspace" and set MIN_FREQ and MAX_FREQ to the same speed. This is the configuration that I am using:
# SPDX-License-Identifier: GPL-2.0-or-later
# Copyright (C) 2012, Sébastien Luttringer
# Copyright (C) 2024-2025, Francesco Poli <invernomuto@paranoici.org>

# Configuration file for cpupower.service systemd service unit
#
# Edit this file (uncommenting at least one of the options, depending on
# your preferences) and then enable cpupower.service, if you want cpupower
# to run at boot with these settings.

# --- CPU clock frequency ---

# Define CPU governor
# Valid governors: ondemand, performance, powersave, conservative, userspace
GOVERNOR='userspace'

# Limit frequency range
# Valid suffixes: Hz, kHz (default), MHz, GHz, THz
MIN_FREQ="800Mhz"
MAX_FREQ="800Mhz"

# Set a specific frequency
# Requires userspace governor to be available.
# If this option is set, all the previous frequency options are ignored
#FREQ=

# --- CPU policy ---

# Set a register on supported Intel processore which allows software to convey
# its policy for the relative importance of performance versus energy savings to
# the processor. See man CPUPOWER-SET(1) for additional details
#PERF_BIAS=
Enable and start the cpupower service:
systemctl enable cpupower
systemctl start cpupower
Check the output of "cpupower -c 0-3 frequency-info" again to confirm that the governor and speeds are set correctly.
Configuring CPU Core Pinning
As this is a single purpose appliance only being used as an NTP server, in my configuration I have dedicated CPU cores 2 and 3 to timing related processes (Chrony, GPSD and PPS). This is in order to minimise any impact of other processes on the timing processes.
CPU core isolation and the default IRQ affinity can be configured by editing the "/boot/firmware/cmdline.txt" and adding the following to the end of the command line:
isolcpus=2,3 irqaffinity=0-1Ensure that all the parameters are on a single line in this file.
The CPU affinity for processes can be set using systemd. Firstly create an override for GPSD:
systemctl edit gpsdAdd the CPUAffinity to pin it to CPU cores 2 and 3:
### Editing /etc/systemd/system/gpsd.service.d/override.conf
### Anything between here and the comment below will become the contents of the drop-in file

[Service]
CPUAffinity=2 3

### Edits below this comment will be discarded
Do the same for Chrony:
systemctl edit chronyAdd the CPUAffinity to pin it to CPU cores 2 and 3:
### Editing /etc/systemd/system/chrony.service.d/override.conf
### Anything between here and the comment below will become the contents of the drop-in file

[Service]
CPUAffinity=2 3

### Edits below this comment will be discarded
In order to pin the PPS IRQ I used the script from Jeff Geerling's Guide.
Create "/usr/local/sbin/pin-pps-irq.sh":
#!/bin/sh
irq=$(awk '/pps@/ {sub(":","",$1); print $1}' /proc/interrupts)
[ -n "$irq" ] && echo 3 > /proc/irq/$irq/smp_affinity_list
Make it executable:
chmod +x /usr/local/sbin/pin-pps-irq.shCreate a systemd unit file "/etc/systemd/system/pin-pps-irq.service":
[Unit]
Description=Pin PPS GPIO IRQ to isolated CPU3
After=multi-user.target

[Service]
Type=oneshot
ExecStart=/usr/local/sbin/pin-pps-irq.sh

[Install]
WantedBy=multi-user.target
Enable and start the service:
systemctl enable pin-pps-irq.service
systemctl start pin-pps-irq.service
Additional Chrony Settings
I have also applied these settings to "/etc/chrony/chrony.conf":
lock_all
sched_priority 50
The "lock_all" option locks the Chrony process in RAM and prevents it being paged out to disk to help maintain more consistent time. The "sched_priority 50" configuration option sets Chrony to use the SCHED_FIFO real-time scheduler at a priority of 50.
U-blox LEA-M8T Constellation Selection and Timing Mode
The U-blox LEA-M8T can track multiple GNSS systems - GPS, Galileo, GLONASS and BeiDou - however only 3 can be selected concurrently. Section 1.5 of the U-blox LEA-M8T data sheet contains a table showing the possible combinations.
I read some suggestions that GLONASS is likely the poorest option for timing applications so decided to enable the GPS, Galileo and BeiDou. It seems that GPS and GLONASS were enabled by default on the module I purchased.
The "ubxtool" command can be used to enable and disable constellations:
ubxtool -d GLONASS --device /dev/ttyAMA0 -P 22.00
ubxtool -e GALILEO --device /dev/ttyAMA0 -P 22.00
ubxtool -e BEIDOU --device /dev/ttyAMA0 -P 22.00
I also wanted to ensure that more efficient U-blox binary protocol was being used, and this can also be set with the "ubxtool" command (I didn't check which was configured as the default):
ubxtool -e BINARY --device /dev/ttyAMA0 -P 22.00
ubxtool -d NMEA --device /dev/ttyAMA0 -P 22.00
The U-blox LEA-M8T provides an option for a fixed position time mode which is initiated by sending the "SURVEYIN" command. My initial test with the default values resulted in significantly worse offsets, most likely due to the short duration of the survey-in process resulting in it determining an inaccurate position. I found that running the survey-in process for an hour resulted in a much better result.
ubxtool -e SURVEYIN,3600,5000 --device /dev/ttyAMA0 -P 22.00The survey-in process can be monitored with the following command:
ubxtool -p TIM-SVIN --device /dev/ttyAMA0 -P 22.00The output of the "UBX-TIM-SVIN" will show something like "obs 3601 valid 1 active 0" once the survey in process has completed and the module is in time mode (valid 0 active 1 will be seen when the survey-in process is running).
Overall I believe any gains from changing the constellations and utilising the timing mode were only minor and are offset by the stability of the Raspberry Pi's oscillator which is the limiting factor. Still it is interesting to try the different capabilities of the GNSS module. In future, I may try the thermal stabilization script from the Austin's Nerdy Things guide.
Connecting a PPS LED
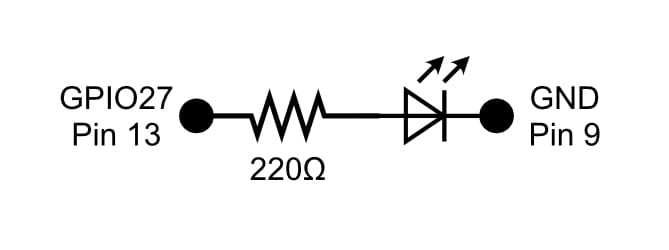
I wanted a simple way to visually confirm that the NTP server was operational and receiving a GPS PPS signal so I connected an LED to the Raspberry Pi. The connection is shown in the following diagram:
In order to control the LED, I asked Claude (Sonnet 5) to create a simple script so the LED will blink every time a PPS pulse is received.
The script and systemd unit are below:
#!/usr/bin/env python3
"""Flash an LED on every PPS pulse.

Reads pulse events from the kernel PPS device (via `ppstest`, from the
pps-tools package) rather than touching the PPS GPIO line, which is owned
by the pps-gpio driver. Safe to run alongside chronyd.

If no pulse arrives for TIMEOUT_S seconds the LED is left off and a
message is logged; a second message is logged when pulses resume.
"""
import re
import select
import subprocess
import sys
import time

from gpiozero import LED

PPS_DEV = "/dev/pps0"
LED_GPIO = 27       # BCM number. Must NOT be your PPS input pin.
PULSE_S = 0.1       # LED on-time per pulse
TIMEOUT_S = 2.5     # no pulse for this long => PPS considered lost

# ppstest line: source 0 - assert 1790505699.000000123, sequence: 1234 - clear ...
ASSERT_RE = re.compile(r"assert\s+(\d+)\.(\d+),\s+sequence:\s+(\d+)")


def log(msg):
    print(msg, file=sys.stderr, flush=True)


def main():
    led = LED(LED_GPIO)
    proc = subprocess.Popen(
        ["stdbuf", "-oL", "ppstest", PPS_DEV],
        stdout=subprocess.PIPE,
        text=True,
        bufsize=1,
    )
    lost = False
    try:
        while True:
            ready, _, _ = select.select([proc.stdout], [], [], TIMEOUT_S)
            if not ready:
                if proc.poll() is not None:
                    log("ppstest exited unexpectedly")
                    return 1
                if not lost:
                    log("PPS lost: no pulse received")
                    lost = True
                continue

            line = proc.stdout.readline()
            if not line:
                log("ppstest exited unexpectedly")
                return 1

            if not ASSERT_RE.search(line):
                continue  # startup/banner lines

            if lost:
                log("PPS restored")
                lost = False

            led.on()
            time.sleep(PULSE_S)
            led.off()
    except KeyboardInterrupt:
        return 0
    finally:
        led.off()
        proc.terminate()


if __name__ == "__main__":
    sys.exit(main())
[Unit]
Description=Flash an LED on each PPS pulse
After=chronyd.service
[Service]
ExecStart=/usr/bin/python3 /usr/local/bin/pps-led.py
Restart=on-failure
RestartSec=5
Nice=10
# Keep this off the core that services the PPS interrupt
# (assumes PPS is on core 3; adjust to match your setup)
CPUAffinity=0-1
[Install]
WantedBy=multi-user.target